LEARNING ADOBE ILLUSTRATOR
Watch this first
UNIT 1 - BASIC SHAPES & COLORS
Unit 1 Tutorials - Open Illustrator, use File>New to bring up a blank piece of paper. Watch these short tutorial videos in order. As you watch, pause the video and practice the skills on a blank Illustrator page. Practice until you understand the skill, then continue with the video.
UNIT 1 ASSIGNMENT
|
|
CHECKLIST FOR CREDIT:
Recreate the picture to the right as close as you possibly can.
Your final picture must have:
- 2 Circles
- 4 Skinny Rectangles
-1 Octagon
- 2 Stars (Make 1 skinny)
- Variety in line thickness
- Variety of colors
Your final picture must have:
- 2 Circles
- 4 Skinny Rectangles
-1 Octagon
- 2 Stars (Make 1 skinny)
- Variety in line thickness
- Variety of colors
HOW TO SAVE AN ILLUSTRATOR FILE: CLICK HERE
HOW TO EARN CREDIT! CLICK HERE
UNIT 2 - SELECTION, PATTERNS, GRADIENTS
Unit 2 Tutorials - Watch these short tutorial videos in order. As you watch, pause the video and practice the skills on a blank Illustrator page. Practice until you understand the skill, then continue with the video.
UNIT 2 ASSIGNMENT

|
CHECKLIST FOR CREDIT:
Create a picture of an alien abduction. You may copy the one above or create your own.
REQUIREMENTS:
_ 10 Modified shapes using direct selection tool (white arrow)
_ Fill with a wide variety of different patterns and gradients.
_ Demonstrate a wide variety of stroke colors and thicknesses.
_ Demonstrate plenty of overlapping.
REQUIREMENTS:
_ 10 Modified shapes using direct selection tool (white arrow)
_ Fill with a wide variety of different patterns and gradients.
_ Demonstrate a wide variety of stroke colors and thicknesses.
_ Demonstrate plenty of overlapping.
HOW TO SAVE AN ILLUSTRATOR FILE: CLICK HERE
HOW TO EARN CREDIT! CLICK HERE
UNIT 3 - LINE TOOLS & PEN TOOL
LINE TOOL
PEN TOOL
| pen_tool_curve_practice.ai |
UNIT 3 ASSIGNMENT
Assignment 1 - instructions
|
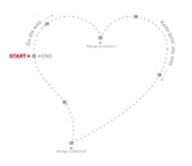
_ Download the file of the heart.
_ Seriously, DUDE! Make sure that you begin by setting the fill color to none and the stroke to 3 pts and red. _ Trace the heart using the pen tool. _ ATTENTION: The line should be smooth (curved) and it should be one continuous line. You'll likely need to try this several times. _ OK...I also know that you just ignored the previous instruction as well. So, please focus on tracing in one continual line. _ Fill the heart in with pink. |
|
Assignment 2 - instructions
|
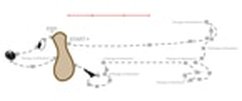
_ Download the file of the doggie.
_ Seriously, DUDE! Make sure that you begin by setting the fill color to noneand the stroke to 4pts. It will also help to give the stroke a color. _ OK....so I know that you just ignored the previous instruction. Go back and read it, and be sure to do what it says. _ Trace the doggie using the pen tool. _ ATTENTION: The line should be smooth (curved) and it should be one continuous line. You'll likely need to try this several times. _ OK...I also know that you just ignored the previous instruction as well. So, please focus on tracing in one continual line. _ Continue tracing so that the shape goes right over (covers) the ear, nose and eye. _ Fill the doggie in with a light color. Send it behind the ear. |
|
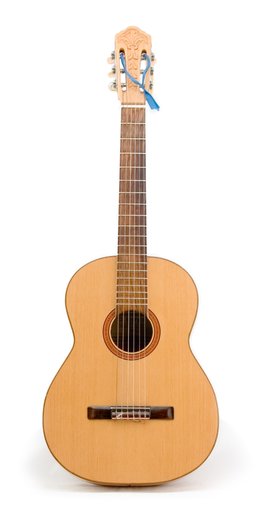
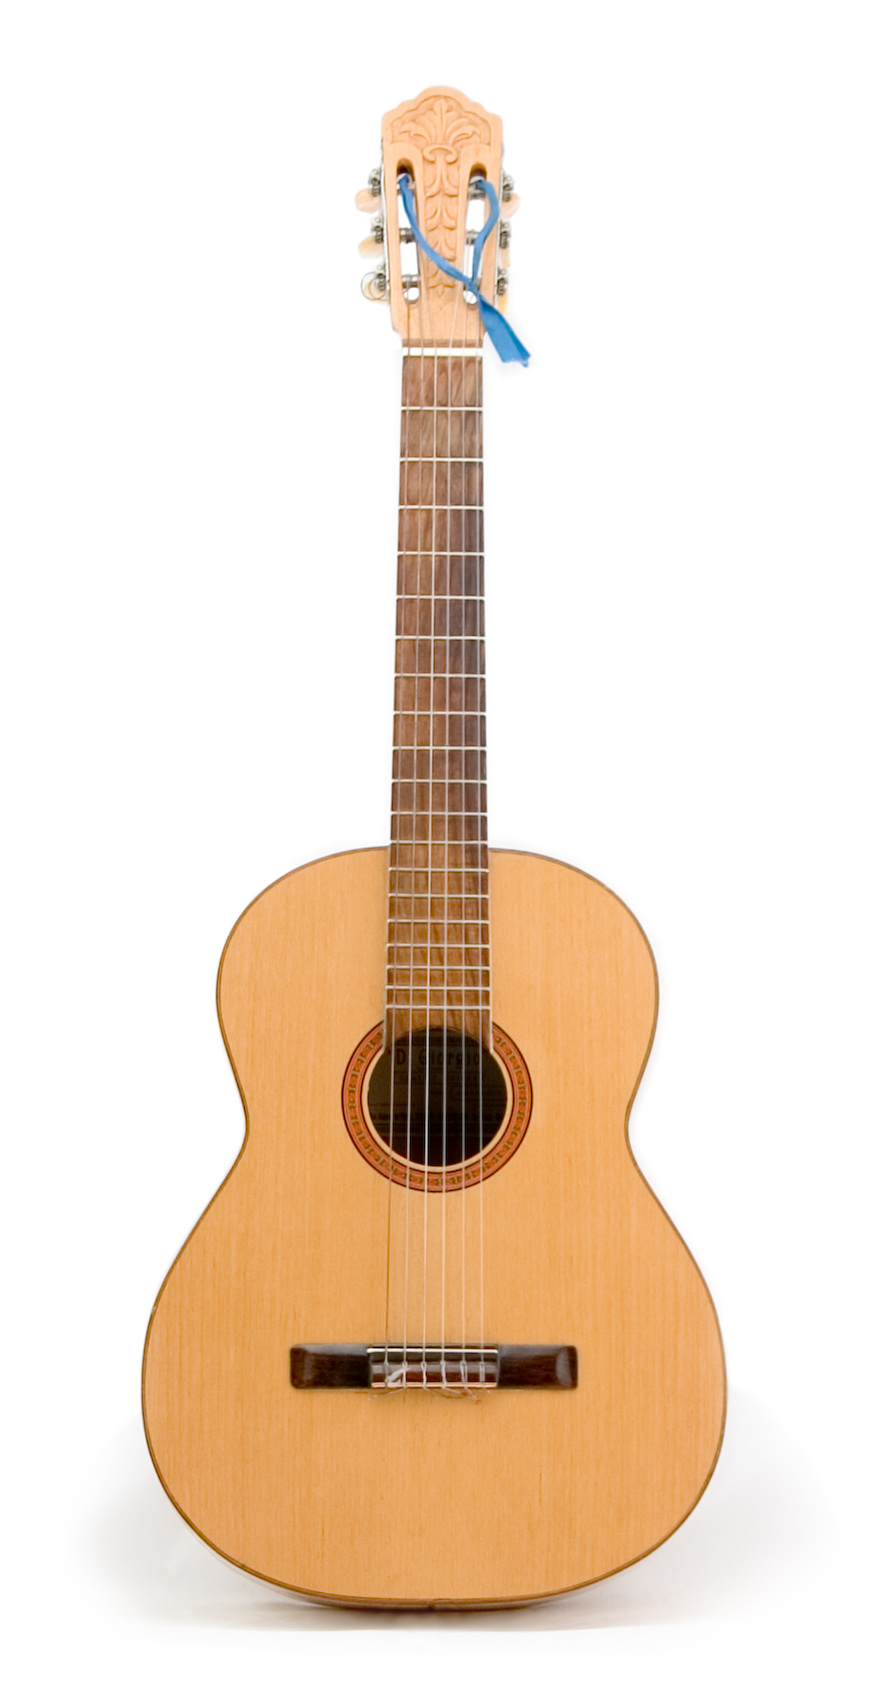
Assignment 4 - Tracing Objects with the Pen Tool
1. Download this photo
2. Trace the object using the pen tool.
3. Make sure to choose none for the fill. The line should be a black, 2 pt line.
4. The line should be smooth (curved) and it should be one continuous line. You'll likely need to try this several times.
5. Close each shape. They can overlap.
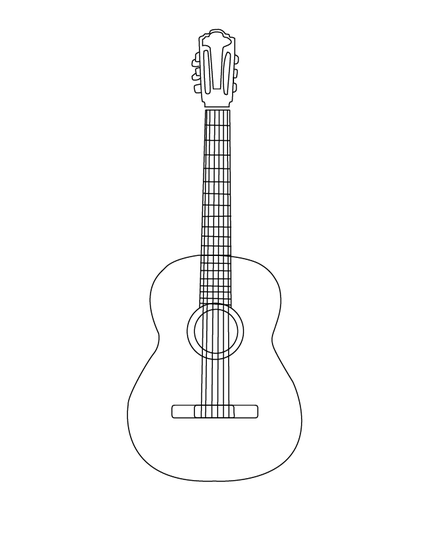
6. The final photo should look like the one below
2. Trace the object using the pen tool.
3. Make sure to choose none for the fill. The line should be a black, 2 pt line.
4. The line should be smooth (curved) and it should be one continuous line. You'll likely need to try this several times.
5. Close each shape. They can overlap.
6. The final photo should look like the one below
|
|
Unit 5 - Grouping & Isolating
UNIT 5 ASSIGNMENT
Unit 5 Assignment - instructions (25 minute assignment). Now, WATCH THIS VIDEO BEFORE YOU BEGIN!
Download the file of the face parts.
This activity can take 25 minutes or it can take an hour...depending on whether or not you choose to ignore some pretty obvious hints. This activity is about procedure and repetition, so pay close attention and it will go fairly quickly.
Modify all of the heads to create different faces out of the provided face parts.
_ SERIOUSLY! GROUP THE HEAD PARTS BEFORE CHOOSING FACIAL PARTS!
_ SERIOUSLY! GROUP FACIAL PARTS BEFORE MOVING THEM!
_ SERIOUSLY! The previous 2 lines are in bold for a reason!
_ You'll run out of eyes and facial parts. So, you'll need to get more by copying and pasting.
_ Use the isolation technique to give each head crossed eyes, yellow teeth, etc. Minimally, each head will have an isolated modification in the "facial parts" group as well as a modification in the "head parts" group.
Here's a sample of the finished assignment.
UNIT 6 - TRANSFORMATION TOOLS
UNIT 6 ASSIGNMENT
|
Use the transformation tools to transform the objects. It's pretty much a no brainer.
CLICK HERE TO DOWNLOAD THE ASSIGNMENT |
UNIT 7 - PATHFINDERS
UNIT 7 ASSIGNMENT
|
Unit 7 Assignment - instructions (20 minute assignment)
Demonstrate proficiency with the unite, minus front, and divide pathfinders. _ Show a minimum of 5 designs per section. _ Each object MUST clearly show a different color stroke. Download the file for this assignment. |
UNIT 8 - TYPE (TEXT) TOOL
|
Don't forget to practice while going through these tutorials!
type basics & just clicking - Dude, practice before you move on clicking and dragging - Dude, practice before you move on |
UNIT 8 ASSIGNMENT
|
Unit 8 Assignment - instructions (30 minute assignment)
Demonstrate proficiency with the type tool. Start thinking about DESIGN. Let's demonstrate the tools but also make it look cool. Create a flag of your choice with a variety of fonts and colors Here's a link to a random text generator if you'd like. _ Show BOTH methods of getting type on the paper. _ SERIOUSLY! Show BOTH methods of getting type on the paper...one will allow you to distort...so do so. _ Show a wide variety of fonts & weights, colors and sizes. _ Show single words, show paragraphs. _ Show all alignments (right, center, left). _ Show different tracking (open letter spacing & tight letter spacing) andleading (line spacing). _ Show different leading (open line spacing & tight line spacing). _ Remember that you know how to rotate, reflect, & shear. |
UNIT 9 - TYPE ON A PATH
UNIT 9 ASSIGNMENT
|
Unit 9 Assignment - instructions (30 minute assignment)
Demonstrate proficiency with putting type on paths and shapes. DESIGN this activity (as opposed to simply slapping stuff on the page). Let's demonstrate the tools but also make it look cool. _ Emphasise type on a path more than shapes or photos, etc. _ Demonstrate all of the skills presented in the "type on a path" tutorials. _ Show a wide variety of fonts, font sizes & weights, colors. Unit 9 Requirements Copy the picture on the right Enter in your own song lyrics Do NOT worry about putting in a picture |
UNIT 10 - OUTLINING TYPE
UNIT 10 ASSIGNMENT
|
Unit 10 Assignment - instructions (30 minute assignment)
Create your name and a short phrase of what you like in the following form: My name is ____________ and I like ______________ EXAMPLE: MY NAME IS MR. BOBERG AND I LIKE BASEBALL. Make is goofy and creative as possible. Use everything we have learned so far.. _ Use only type. _ Clearly demonstrate use of pathfinders and tweaking letters. _ Use different fonts, colors, gradients, and strokes. _ Use the direct select tool (white arrow) to tweak letters. _ Rotate, shear, reflect. _This should be AS CREATIVE AS POSSIBLE. Go crazy on this one! |
UNIT 11 - ADVANCED OUTLINING TYPE
UNIT 11 ASSIGNMENT
|
Unit 11 Assignment - instructions part 1 - instructions part 2 (20 minute assignment)
Create 3 short phrase designs which demonstrate proficiency with altering "donut" letters as well as "biting" letters. COPY THE FIRST TWO EXACTLY MAKE THE THIRD ONE YOUR OWN Download the file for this assignment. |
